|
from astrophotographer Doug Murray back to spaceweather.com All you need to take pictures of meteors is the following:
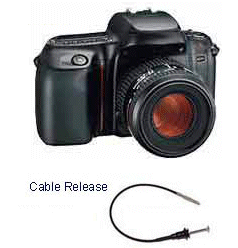
Any brand of 35mm camera will work (needs to have the B setting, mirror lock up is also nice to have but not required). Old manual cameras work great, because they do not need batteries, and you cannot use autofocus for this type of photography anyway. You can find these old cameras at garage sales, on Ebay, pawn shops, or maybe a relative or friend can give you one. Put the camera on the tripod, attach the cable release to the camera, set the shutter speed to "B", set the aperture on the lens to it's lowest number (for example f 2), set the focus to infinity, aim the camera where you think meteors may appear (near the radiant of meteor shower is a good spot) then push down on the cable release to open the camera's shutter. Keep the shutter open until you see a meteor go thru the sky where your camera is pointed. After the meteor is gone, let go of the cable release to close the shutter which takes the picture. If you don't see a meteor in a minute or two, release the shutter, wind the film to the next frame and start over. Depending on the amount of light pollution in your area it will start to lighten the sky image on the film and washout any meteors if you expose the film for too long. You need to experiment with different exposure times to see what times work best for your local sky conditions. If possible, take a roll of film of the night sky a couple of days before the meteor shower. Take different exposure times and write them down with the frame number and f stop to refer to when looking at the processed negatives or prints. 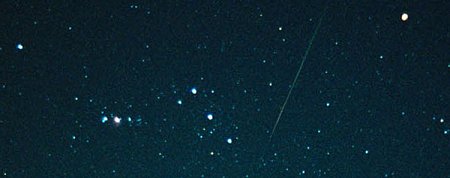 Above: D. Murray captured this picture of a Leonid meteor streaking through Orion in 2000. [more] Other points to consider: Wide angle lens such as 35mm, 24mm and smaller cover more of the sky, but the meteors will be smaller on the negative and print. You may want to aim your camera at the darkest part of your sky to get the best contrast of the meteor, and the sky. If a cloud (especially illuminated by lights or the moon), moves thru the sky before you see a meteor, release the shutter and start another exposure after the cloud passes. Illuminated clouds will washout all but the brightest of meteors. To avoid the stars appearing as streaks, shorten the exposure times, or mount your camera on a motorized equatorial telescope mount if available, or you can make yourself a "Barn Door Tracker." Do not be disappointed if the photo lab technician tells you that your film "did not come out". They are used to looking at terrestrial images and not meteors that look like a tiny black line on a clear negative. That happened to me when I picked up my very first roll of meteor shots. They told me nothing came out and there was no charge for the processing, and I ending up with two very nice meteors for free. If you have access to a film scanner, you may want to just tell the photo lab to "Develop Only, no Prints" and you just get the negatives for about $2, then scan the negatives and look for any meteors. Meteor Photography Web Links Meteor Photography -- from IPS Radio & Space Services Meteors on Film -- photo tips from familyeducation.com Photographic Observer's Page -- a guide to meteor photography from the International Meteor Organization A Beginner's Guide to Leonid Photography -- from NASA Headquarters Meteor Capture Calculator -- this free software by Ulrich Beinert can help you evaluate your photo setup for capturing meteors on film. Meteor Photography -- by Michael Oates |
 Any
35mm camera with a "B" or Bulb setting. I use a 1967
Nikon F
Any
35mm camera with a "B" or Bulb setting. I use a 1967
Nikon F